IMS5 features in-camera three-exposure HDR processing using a modified Exposure Fusion algorithm. When choosing the exposure bracket parameters, the goal is to have useful information for EVERY pixel in at AT LEAST ONE of the three images: under-exposed, normal, and over-exposed. If a pixel color value is either all-white (rgb: 255,255,255) or or all-black (rgb: 0,0,0) in all three images, then the only possible HDR result will be a gray value with total loss of color information.
The camera has the AutoExposure feature and it is recommended to use it to select the normal exposure. For best results, point the camera towards the area in the pano that will occupy most of the pano or that is the most important in the pano.
When choosing the normal exposure manually, you can use the LCD screen on the DSLR. Try to avoid all-white areas on ceiling or floor that result from bright light sources (sunny window or indoor lighting) as the likely result will be a gray blob in that area of the image. You can also use the histogram display on the LCD screen for quick assessment of how many all-white pixels you have - you want to avoid having too much signal on the right side of the histogram, but there will always be some signal there, such as from windows or indoor lighting.
When learning about how HDR works, you can inspect original images on the IMS5 camera right after you take a shot to assess whether you have useful information in each of the three images. To do that, navigate in a web browser (on the device connected to the camera over WiFi) to these URLs, this is best done from a desktop computer:
http://192.168.5.1/data/p0.jpg for normal image
http://192.168.5.1/data/p1.jpg for under-exposed image
http://192.168.5.1/data/p2.jpg for over-exposed image
Here is what you can expect to see.
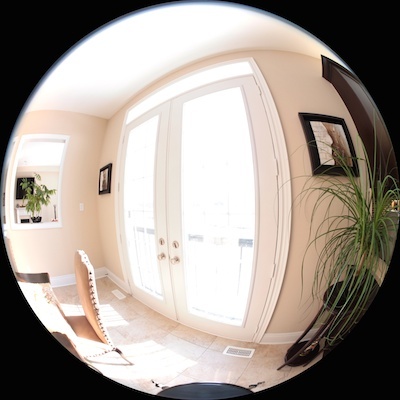
This is the normal image. In this particular example it is a bit over-exposed (check the ceiling) and could have been made a bit darker.
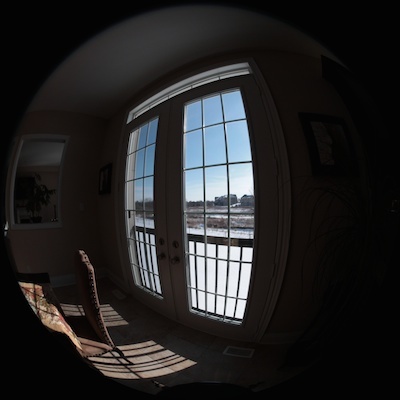
This is the under-exposed image and its purpose is usually to provide a good view through windows.
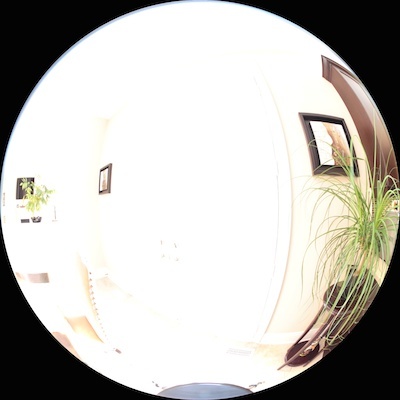
This is the over-exposed image and its purpose it to provide a good appearance of any areas that were too dark in the normal image, such as the cabinets on the right in this example. It also looks a bit over-exposed and would have been a bit darker if the normal image exposure was set shorter.
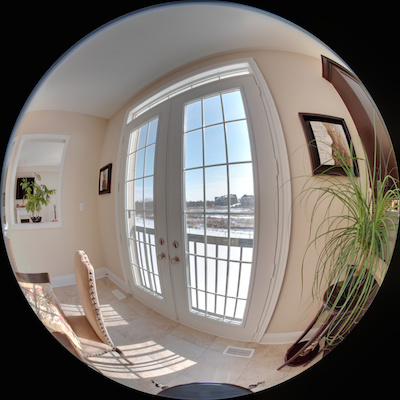
And here is the final result. HDR is quite forgiving to the normal exposure being off, which happened in this case, but we still avoided gray blobs to a large extent. If the normal image exposure was set a bit shorter, the result would look even better.