What are the different files used for? I noticed the s.jpg files are a much lower resolution.
From what I know h1 is hi-res version for the actual tour. s1 is a low res version.
You only need to worry about the h1
S
Hi There
I just received my Planix this morning so have been doing some tests with it.
I was hoping that I would have got some spheres or H1 photos etc to be able to modify say in Photoshop or Lightroom, however, when I look at the H1 etc, they are the photos with me in when I did the 2 shot process, but I am not in the ones that I am looking at in Stitch.
Did I do something wrong ?
Only guessing here, but may be for preview icons on site to speed things up…I know for photos, with the CamRanger, we can set a preview version of small jpg for faster preview loading.
Funny thing, one time I did a nice Photoshop camera removal to only find out I did it to the S version 
Chris has mentioned before that the s_.jpg files are used while shooting and the h_.jpg files are the production images. It sounds like the s_.jpg files are more or less thumbnails.
I was actually just trying to use these three H1.jpg files in another Stitching program and these files don’t work. this is what I just asked in support ticket but not sure if they can help with another stitching software.
Hello Support,
I’m trying to upload these files directly from Survey: Image 2021-05-01 at 10.31.1...
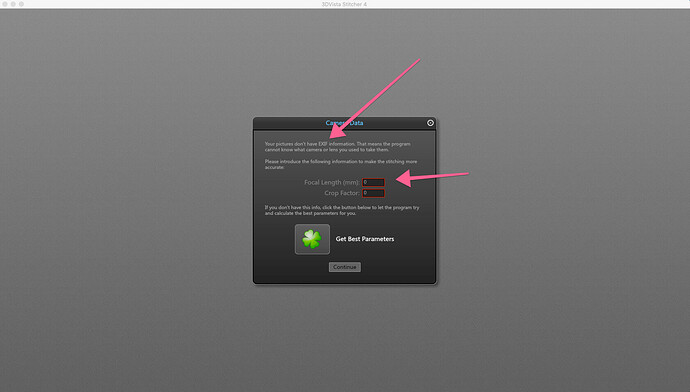
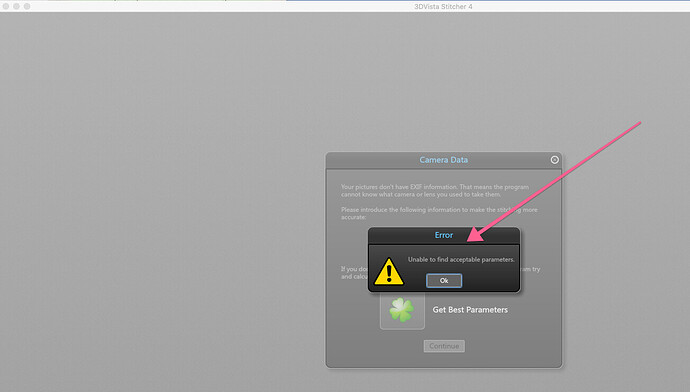
Into 3D Vista Stitcher to create a Hybrid 3D Tour with an integrated iGUIDE. I’m not sure if I’m taking the correct files as I get the message that my jpgs don’t have EXIF information. Do you know the EXIF information or am I taking the wrong files to do this? Please see the messages I get:
I thought any stitching program should be able to handle these files!?
I just checked some of the h_.jpg and s_.jpg files from my IMS-5 and none of them have EXIF info.
It sounds like the app you’re trying requires EXIF data in order to process the files – either provided by the camera or entered manually.
Have you tried the “get best parameters” button? It might take some trial and error to get the focal length and crop factor that work best. You could manually edit EXIF info for each h_.jpg file but if that app applies the settings you enter across the images, that’s probably much faster.
If you’re using an IMS-5, the focal length on the lens is 5.6mm and the crop factor on a Digital Rebel is 1.6.
These are not files that you would stitch in 3DVista - you would need separate files to stitch into one pano to use that. All you have is spheres.
for your second question regarding EXIF info, you need to get a EXIF Injector like EXIF fixer to inject the 360 info into it.
1 Like
Well as soon I inserted the focal length and crop factor as per Leroy’s former comment, the 3DVista Stitiching software was able to produce a single panorama/sphere from these 3 files similar to what we get back from iGUIDE once processed through Stitch. Thanks again Leroy!
Thats great to hear - I need to try that.
Would you then do your post processing and use those to upload to iGuide ?
Planix’s Survey will produce either one h1.jpg file (when in single shot mode) or h1.jpg and h2.jpg files (in two-shot mode). Those files are complete 360 images created by Theta. They can be processed in Photoshop or Lightroom before they are imported into Stitch. Stitch will align verticals, apply default color processing (which can be turned off via presets) and will stitch h1.jpg and h2.jpg into a single 360 image, removing you from it. If you still see yourself in the output image (twice), that means you were standing on the wrong side of the camera, but you can right-click on that pano in Stitch and tell it to swap h1 and h2 (Reverse Camera Rotation).
If you want to edit 360 images produced by Stitch, that can only be done once the iGUIDE is published. You can use the Replace Pano function on the Portal to download, edit and upload back 360 images and that will need to be done one image at a time. The same way 360 images can be downloaded and uploaded for virtual staging by a 3rd party service.
Unlike Planix, IMS-5 produces 3 fisheye images (h1-h3.jpg) which Stitch converts to a 360 image using a distortion model individually calibrated for each IMS-5 lens. The h.jpg files can be processed in Photoshop before importing a project into Stitch, but any processing should not involve image distortion and should only be done for color manipulations.
Stitching fisheye images in another software without using proper lens distortion model will most likely result in 360 images where straight lines may be wavy and distorted, that will vary from lens to lens.
Finally, both Planix and IMS-5 create and use downsampled s.jpg files for preview in Survey on smaller mobile screens to save time due to limited WiFi bandwidth, especially when onsite in a potentially very congested WiFi environment.
1 Like
No, that way i can build a Hybrid tour with 3D vista for the outside area with an embedded iGUIDE for the inside with floor plan but can shoot everything with the IMS-5 camera and decide which images are being processed through the Vista stitching software and which ones through iGUIDE.
— “If you want to edit 360 images produced by Stitch, that can only be done once the iGUIDE is published. You can use the Replace Pano function on the Portal to download, edit and upload back 360 images and that will need to be done one image at a time.” —
Are you confirming that I can’t color correct the panos in Photoshop before I send them to the drafters and I have to do all that work after I receive my finished project?
UPDATE: I saw the tutorial on editing before uploading. Add-on question: I opened one of the panos in PS and it looked way different then it did in Stitch Wizard. The adjustments I made in Wizard look fine but when I opened the same pano in PS overall WB was way yellower. Which do I rely on, Wizard or PS?
Additionally, I’m working with a virtual stager who wants to stage the panos for the tour. Does she need to do that after the iGuide is published as well or can she do that before?
I’m beginning to gather the drafters can’t work with any pre-modified jpg files. Is this a correct assumption?
jarid
Is the best way to edit in PS to open the jpg from withing Stitch?
Stitch uses non destructive editing, so any changes you make to colours or white balance etc do not actually change the image. They are written to a configuration file that tells the system what changes need to be applied to the image. So you can change the colour balance and hue etc in stitch. It when you open that same image in photoshop those changes will not be reflected as you are looking at the original image. I have found the only thing I ever do in photoshop is remove unwanted items like camera and other reflections and shadows. As a rule the colour changes made within stitch are satisfactory. I hope that helps you.
Yes helpful, thank you kindly!
Jarid
I wrote about my image editing process here
As mentioned, if you shoot in single shot mode, you get one complete 360 photo. When shooting in 2 shot mode, the Theta camera will show you two stitched images. However, when you look at the images on the computer, you’ll see two located in the folder of that particular shot. The only way to edit a photo in 2 shot mode is to download it once your iGuide has been submitted and replacing your image online.
Hopefully this helps ![]()
I should almost write an edit process on here. I get asked and see these posts often. lol
Thank you, I read y our post about Aurora HDR. The additional information yo provided is helpful as well.